Building an eCommerce website may seem hard. It’s like learning how to drive—managing the car and keeping an eye on the road would seem impossible at first. If you’re just starting out, working with Ecommerce Web Design Services can make the process much smoother. Professionals can help you create a store that not only looks great but is also user-friendly and optimized for sales.
Let’s dive in to find out how to create a great eCommerce store.
Step 1: Choose Your eCommerce Platform
First things first – start with a great platform. The platform you pick should take care of everything. It shouldn’t be either too expensive or have DIY options for everything.
The experience differs between the two types of platforms.
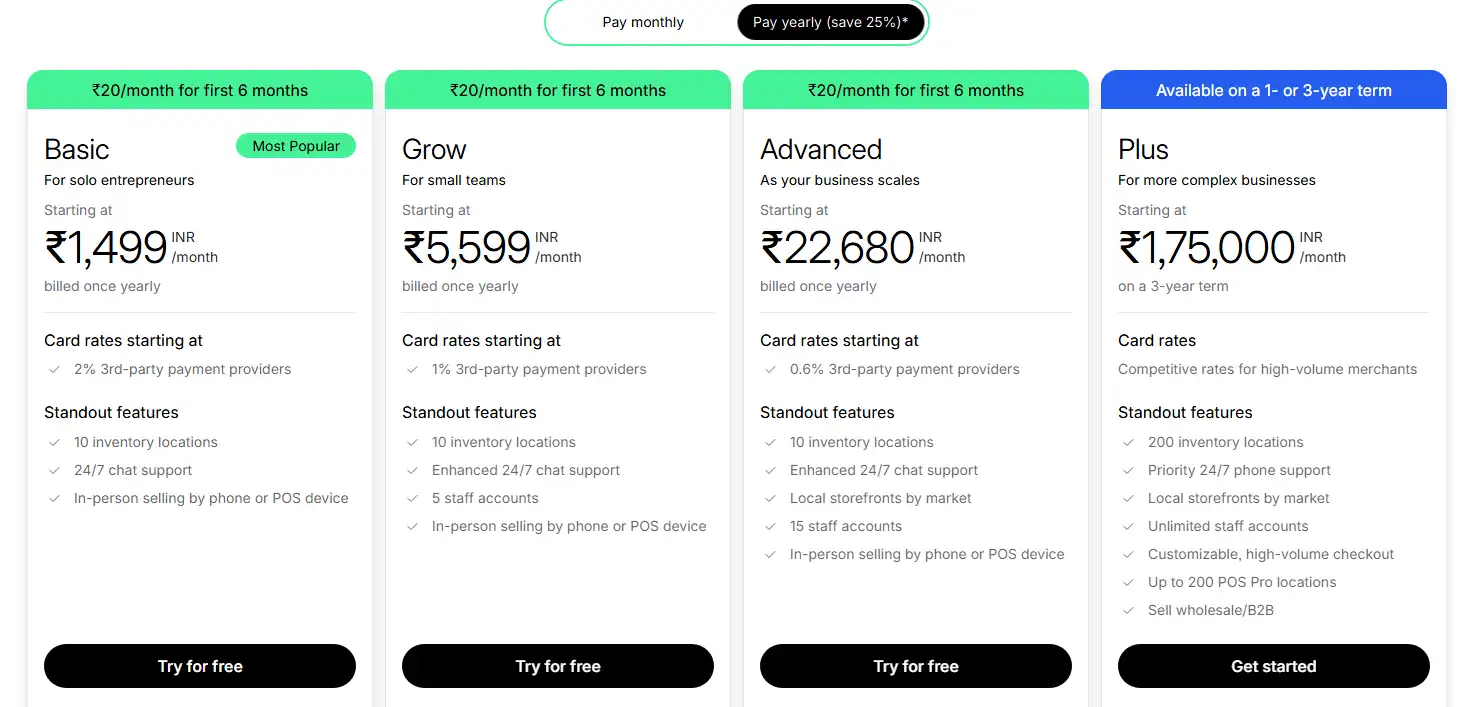
Shopify remains the darling of beginners. Why? It’s intuitive, handles hosting, and comes with built-in payment processing. Shopify is sleek and feature-rich. But the prices are high too. Monthly fees start around $29. It’s reliable, secure, and offers premium templates.
Shopify is the market leader, with almost 29% of all eCommerce sites using their platform. It’s popular than most eCommerce site builders. Monthly costs start around $29, plus transaction fees ranging from 2.4-2.9%, depending on the plan you choose. According to Yagura, Shopify has nearly 5 million daily active users.
The same site suggests that most Shopify stores are in the US numbering 2.67 million, while the United Kingdom follows has 0.21 million Shopify stores.
Shopify is a smart choice that want a stress-free management while also wanting to grow in the future. It’s great for those who would like combine both control and convenience.
Cybernews named Shopify as one of the best eCommerce website builders. This speaks to its credibility.
WooCommerce is different. Built on WordPress, it’s free but requires someone with technical know-how.
It’s cost-effective at the start, but it means you need to DIY a lot of things.
As such, you are always fixing issues on the platform. You’ll need separate hosting, security measures, and plugins for advanced features.

Squarespace appeals to the design-minded. Their templates are gorgeous – the kind that make other websites seem basic. Squarespace is great for any shop specializing at selling things that aren’t easily found. Think-artisanal products with some built-in customization options. Customization options are limited.
It often feels like buying a beautiful house that you can’t renovate.
BigCommerce offers robust built-in features without transaction fees. It’s great for fuelling quick growth. This is a practical platform for beginners. The sites may not be the most appealing. You’ll need to dedicate some time to polishing the default themes you receive.
Choose your platform based on what skills you have, your budget, and goals. Starting small? Shopify. Tech-savvy? WooCommerce. Design-focused? Squarespace. Growth-oriented? BigCommerce. All of these are part of the wider category of eCommerce website building platforms, each offering unique strengths depending on what your store needs.
Step 2: Choose a Domain Name
Your domain shows others where you exist online. It’s your online address.
Start with something easy to remember by as well as brandable. Make it something your customers can remember you by.
Avoid common pitfalls. Skip hyphens if they’re not necessary. Avoid numbers unless they’re integral to your brand.
There are great domain extensions, for example .store. Take hold of these new domain extensions.
Buy multiple variations of your domain to prevent competitors from taking them. It’s like buying insurance.
Step 3: Start website Customization

If using a website builder, choose a good template for your site. You can customize it by applying different styles, colors, font options, and all of these choices affect how customers experience your website. So, keep this in your mind as you design something.
Hire web developer or designer to provide professional aesthetics and functionality. Alternatively, if you have basic coding knowledge, AI code generators can help you create custom features or modifications without extensive programming experience.
Draw a wireframe that helps you understand your site’s navigation better. Include the following in your roadmap.
- Homepage (what customers will see first)
- Category pages include product pages that let people browse and select
- Include the shopping cart page
- Include an about us page that tells others what you sell and your core mission
- Include contact information
- Search engine in your site
- Email subscription form
- Legal information like terms and conditions
Research your competitor’s sites for inspiration. As you feel more comfortable, use that to customize the store
You will want to ensure users to navigate the virtual store as they learn more register, or add items to the account.
Step 4: Set up your online store.
In the next step, you add products to your pages. What’s most important here? Quality product photos coupled with consistent descriptions that make products stand out. Separate the page by categories, by colors, and product type.
If you offer multiple options, let customers sort or filter different things be it price, new arrivals, or product rating. When setting up your website, consider partnering with a WordPress web design company to ensure a professional and customized look.
Assuming your initial products are ready, you need shipping and payment methods added for customer service.
Your inventory should ideally match what’s available in the account. If you run a service-based store like a beauty salon, tools like beauty salon accounting software help you track payments, appointments, and expenses easily.
Set up a payment processor with Shopify or external add-ons like Square.
Step 5: Launch your website.
Once you finalize the site design, product layout, and other aspects, create social media platforms for your brand to post product images. This is your chance to shine and share what you created.
To that end, a launch promo using sponsored posts or ads can boost brand awareness and help you reach your target audience. Google and Facebook ads can help your business get an initial set of customers. This is to be followed up with blogging and email newsletters to gain more exposure.
Pick right keywords
Not every eCommerce website can target everything. Based on the customer profile and products you have decide on the keywords you want to target.
Long tail vs regular keywords
Broad keywords are very broad and are quite competitive. On the flipside, long tail keywords are specific, have very less competition, and offer higher conversion rates as well. That’s because they are highly relevant.
Volume
The higher a keyword’s volume, the more traffic you can get. But make sure you don’t get carried away by volume alone.
Step 6: Design Your Website with Heart and Soul
Your site design shows who you are on the inside. Make sure your user experience is above board. You have only a few seconds to make a lasting first impression.
Before you start designing, you need some data.
Start with a clean, professional template.
Navigation should be intuitive. If users need a GPS to find your checkout button, you’ve failed. Keep the main menu items to seven or fewer. We struggle to process more items.
Color psychology matters more than you’d think. Blue builds trust (think Facebook, PayPal), while red creates urgency (hello, clearance sales). Green suggests growth and nature, perfect for organic products. Orange conveys energy and warmth.
Colors do more heavy lifting than you might realize. Blues make people feel secure—payment processors like PayPal use blue. Reds push urgency, so they appear on sale banners. Green is a natural choice for sites selling green products. Orange and red show energy and warmth.
Choose colors that match what you’re selling.
Don’t make people work hard to read what’s on the page. Pick fonts like Times New Roman or Georgia that are easy on the eyes and use them throughout the site.
If an older shopper can’t read your product descriptions, make changes.
Step 7: Product Pages That Convert
Your product photos are doing most of the selling, so they’d better be good. Dark, grainy images aren’t great for conversions. That’s why you need good lighting before you shoot your product images.
You can capture photos using a phone camera and use AI product photoshoot tools to make it professional. Ensure you cover all product angles before you upload images.
Nobody likes reading product descriptions copied from the manufacturer’s specifications. Instead, focus on telling a story.
When telling a story, don’t skip the essentials. Answer these questions:
- How big is it?
- How do you take care of it?
- When does it ship?
Answer questions customers are thinking before they have to ask.
Focus on keywords that people use. You can find those with Google Keyword Planner or SEMrush.
Step 8: Payment and Security Essentials
Trust is everything in online shopping. Make sure your site has proper security certificates. Most website platforms handle this, but it’s worth double-checking.
Alongside SSL and secure payments, installing an antivirus software on your admin devices helps block ransomware, phishing pages, and infected downloads, with lightweight daily scans and behavioral protection to stop zero-day exploits. This extra layer reduces account-takeover risks and keeps storefront credentials and customer data safe.
Give people options for how they want to pay. Credit cards are still popular. Another good choice is digital wallets like PayPal and Apple Pay. Younger shoppers often prefer services that simplify payments.
Don’t ask for information you don’t need during checkout. Every extra form field you add increases the chances someone will abandon their cart. Stick to the essentials: contact info, shipping address, and payment details.
Show off your credentials. Display security badges, return policies, and customer reviews. Social proof is great for building confidence.
Step 9: Shipping Strategy That Makes Sense
How you ship your products determines customer happiness.
Consider shipping costs and weigh the option of adding them to the product price.
Free shipping impacts buying decisions. People often choose a $45 item with free shipping over paying $5 extra for shipping. Our brains work in mysterious ways.
Keep track of your inventory to avoid selling out-of-stock items. It annoys customers to order something that’s already out of stock. Most platforms can handle this, but make sure your settings are correct.
Be truthful about timelines and communicate them to customers. The key here is to under promise at first. Then give customers a pleasant surprise by delivering earlier.
Step 10: Testing Before You Go Live
Before you announce your store to the world, test your site. Try every link.
It’s better to test now than regret later.
The checkout process is important. Go through the checkout process several times. Place real orders if you can (you can always cancel them). Ensure everything works well. A broken checkout is a conversion killer.
People tend to shop on tablets and mobile phones these days. People view sites on smaller screens, which is why testing is important.
Speed is essential for improving search rankings. Use Google’s PageSpeed Insights to see how fast your site loads. Understand how to improve the speed.
Compress your images. Use fewer plugins. Choose reliable hosting.
How much does it cost to create an e-commerce website?
Creating an eCommerce site never has to expensive. Build a simple site and enhance it later with the help of an expert web design agency like Seahawk. Modern tools, including AI recruitment software and platforms that support Lever Integrations, show how AI-driven systems can keep costs low while improving efficiency across different business functions, when GenAI risks such as data privacy, automation errors, and system dependency are properly managed
Taking an AWS course can also help you understand cloud hosting and scalability, ensuring your eCommerce site runs smoothly as it grows.
E-commerce website tips
As you sell more, these tips will help you get even more sales.
Display customer reviews.
Make it simple for customers to post reviews on the site so new visitors are able to make an informed decision. Product reviews improve brand reputation and have a positive impact on sales. Statista’s research shows that 62% of customers experience a superior brand perception if they see a positive review.
Make use of stock images.
Product images are great to understand your product stock images are another option to convey values and mission without spending money on a professional photographer.
and mission without hiring a professional photographer.
Include white space in each webpage.
Negative space refers to space in and around ensign elements. It improves site’s readability as people scroll past pages and establishes a visual hierarchy.
Improve your e-commerce SEO.
Ecommerce SEO begins by using keywords throughout the site’ copy.
enables you to draw more visitors to your site and lead them to purchase your products. SEO can in the long term drive traffic to your eCommerce store for free. What you spend today on SEO will result in organic visitors for several years to come making the investment worth its while. Partnering with a monthly link building company can strengthen these efforts by consistently securing high-quality backlinks, which boost your site’s authority and ensure steady growth in organic rankings. On the flipside, with PPC ads you always need to keep the money pumping.
Conclusion
These are the steps to take to begin your first eCommerce store
First, start with a good platform. Then lay the foundation with a great domain name. Third, design your site well. Use a shipping provider that makes sense. Test all the different elements of your site. Ensure everything works before going live.