
How to Overlay Photos Effortlessly
8 min readEdit Now
Whether you want to amp up your old or boring photos with an all-new fun factor or wish to adorn your special pictures in a way to achieve an aesthetic look, all you have to do is quickly learn how to overlay pictures in this blog post and then make it happen in seconds with the LightX mobile photo editor!
From establishing an understanding of what picture overlays are to learning how to apply them to an image and some of the trendiest ideas about using them, let’s discover it all in detail!
What are Photo Overlays?
A photo overlay, in simple words, is an image that can be added to any other photo. Upon adding, it acts as an extra or an additional layer on top of the image you add it on.
For example, if you have a photo of yourself from winter, and you wish to add some snow to it, that image of snow can be described as a photo overlay.
Sounds fun?
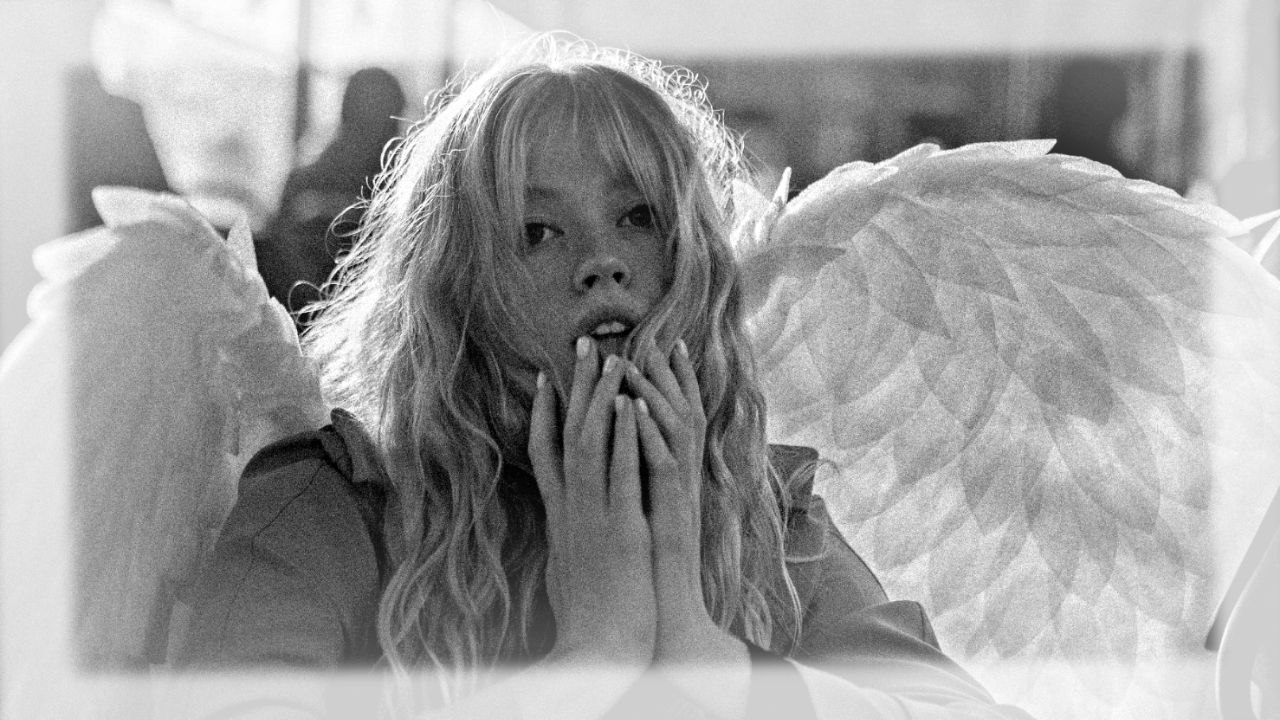
Take a look at the visual representation of the same below:

The photo overlays can be any texture, pattern, or effect. Some of the common and popular ones include clouds, bokeh, glitter, rain, stars, fog, leaves, etc.
What are Image Overlays Used For?
Image overlays tend to add more dimension to a picture and transform its look dramatically.
Wondering how?
When you click an image, it may not seem perfect or complete. You may wish to add elements or effects to it, in order to make it look more appealing. This is where photo overlays come into play. There are overlays for everything.
Post clicking the photograph or while editing it, whatever look you have in your mind for your photograph, you can achieve it with a desired overlay for the same.
With the use of picture overlays, you can make any photo appear more dynamic and attractive.
How to Overlay Pictures in LightX?
Using LightX photo editor as a photo overlay app is an utterly easy process.
You can add photo overlay or overlay two pictures through two different methods.
Let’s learn more about each!
Method 1: Adding an Overlay on Picture Using Effects
The first method you can try in order to add an overlay to your photo is by using the Effects tool. With dozens of beautiful and famous effects, categorized as, Bokeh, Light Leak, Lensflare, Neon, Crumpled, Paint, Artistic, Vintage, Abstract, Grunge, Flame, and more, you can add any to your image as an overlay in seconds.
The steps to add an overlay to your picture using Effects are:
Step 1
Open the LightX iOS or LightX Android app on your device.
Step 2
Choose a photo to edit from your device’s library or stock. If you don’t have a picture ready, you can click one right away by tapping on the ‘Camera.’
Step 3
Once done with image selection, click on ‘Edit,’ and under the ‘Mixing’ category, tap on ‘Effects.’
Step 4
Now, as the ‘Store’ with different categories opens up, browse through different options under any Effects category of your choice, and once decided which one to add, simply tap on it. It will get added to your image as an overlay.
Step 5
Done with the previous step, use your fingers to position and resize the effect as required. Click on the ‘Slider’ to adjust its opacity. If you wish to remove the effect from a certain part of your image, click on the ‘Eraser’ icon on the right. Use the Zoom, Erase, and Brush options under it to erase and restore the effect accordingly. Most importantly, click on ‘Blend’ to pick the most suitable appearance for the added effect from multiple alternatives, including, Multiply, Screen, Overlay, Soft Light, Hard Light, Darken, Lighten, Dodge, Luminosity, Hue, etc. If you wish to replace the effect with a new one, click on ‘Store’ again and select either from the same category or a different one. Finished with all the editing, click on the Checkmark icon at the bottom right.
Step 6
To save your image with an overlay to your device, click on ‘Export’ at the top right of the screen. Select a favorable format out of JPEG and PNG, along with adjusting the resolution as you want and need using the slider. Done with that, click on ‘Save.’ Your image will be downloaded and saved to your device. You can also share it right away across different social media platforms by clicking on the ‘Share’ option.
Method 2: Add Your Own Photo Overlay Using the Blend Tool
If you have your own idea of a photo overlay, you can add and edit one of your own, as well, using the Blend tool in the LightX mobile photo editor. The blend tool, as the name suggests, primarily helps you in blending images together in a perfect way. With overlays, too, you can bring your imagination and creativity alive in nothing more than a few seconds.
The steps to add your own photo overlay to an image using the Blend tool are:
Step 1
Open the LightX iOS or LightX Android app on your device.
Step 2
Choose a photo to edit from your device’s library or from stock. If you don’t have a picture ready, you can click one right away by tapping on the ‘Camera.’
Step 3
Once done with image selection, click on ‘Edit’ and under the ‘Mixing’ category, tap on the ‘Blend’ tool.
Step 4
Now, as the new screen shows up, click on ‘Add Image’ in order to add your own photo overlay to your image. Either select from your device’s Gallery or Stock by just tapping on the image. If you still wish to explore more from the ones that we have available for you, click on the Fill option. Select a catchy overlay from multiple categories, such as Solid, Gradient, Card, Aztec, Floral, Random, and many more, by just clicking on it.
Step 5
Done with the previous step, use your fingers to position and resize the effect as required. Click on the ‘Slider’ to adjust its opacity. If you wish to remove the effect from a certain part of your image, click on the ‘Eraser’ icon on the right. Use the Zoom, Erase, and Brush options under it to erase and restore the effect accordingly. Most importantly, click on ‘Blend’ to pick the most suitable appearance for the added effect from multiple alternatives, including, Multiply, Screen, Overlay, Soft Light, Hard Light, Darken, Lighten, Dodge, Luminosity, Hue, etc. If you wish to add more images, click on ‘Add Image’ again and follow the previous step. Finished with all the editing, click on the Checkmark icon at the bottom right.
Step 6
To save your image with an overlay to your device, click on ‘Export’ at the top right of the screen. Select a favorable format out of JPEG and PNG. Adjust the resolution as you want and need using the slider. Done with that, click on ‘Save.’ Your image will be downloaded and saved to your device. You can also share it right away across different social media platforms by clicking on the ‘Share’ option.
The Best Photo Overlay Ideas to Try
Now that you know all about how to overlay pictures in LightX, let’s go through some of the best and most trendy ideas that you should definitely try!
Double Exposure

You can never go wrong with double exposures. You can turn any photo into a piece of art by going for double exposures with the photo overlay process.
Gradient Photo Overlay

A gradient image can be described as one having a directional change in intensity or color. Adding a gradient image as an overlay to another photo makes it look fascinating. The right colors help set a favorable mood and point of view.
Shape Photo Overlay
Shapes never go out of vogue. Making use of any solid or transparent shape is a great way to add a modern and trendy appeal to an image.
Texture Photo Overlay

Textures as a picture overlay never fail to impress. When added, they can make any image look a hundred times better and more attractive. You can add different textures to set any desired appeal, such as aesthetic, romantic, etc., of the photo.
Text Photo Overlay
Text overlays are as impactful as they sound. You can simply take text from any of your photos. Firstly, remove the unwanted part of that image leaving the text. Then, use that text as the overlay however you like. You can use text photo overlay for making aesthetic edits, vintage edits, and many more.
Add Image Overlay Online to Another Image Easily
If you are looking to bring out an irresistible appeal in your photos or want to mesmerize your audience at the very first sight, the photo overlays are what you need!
With LightX editor, you can overlay two pictures effortlessly and in a customized manner. You can edit them further with the use of other amazing tools and features, such as Filters, Adjustment, Transform for size, and more.
You don’t even have to have any prior skill or experience to overlay two images. It is that easy with LightX!
Now that you have learned how to overlay pictures, get started with LightX editor!
Edit Now


